How to Fix a DeWalt Battery?
DeWalt batteries power a wide range of tools in homes, workshops, and construction sites. They provide energy to drills, saws, impact drivers, and other cordless devices.
Over time, batteries lose their ability to hold a charge, and tools stop working as expected. A battery that does not work properly can slow down a project and waste money if replaced too early.
Many people throw away batteries without trying to fix them because they assume the problem is permanent. In reality, some batteries only need simple maintenance, cleaning, or minor repairs to work again.
Understanding how a battery works, why it fails, and what steps to take can save time, money, and effort. This guide explains, step by step, how to fix a DeWalt battery safely and effectively.
Each step is written in simple words and detailed examples to make it easy for beginners or non-native speakers to follow.
Understanding How DeWalt Batteries Work

DeWalt uses two main types of batteries: lithium-ion and, in older models, nickel-cadmium. Lithium-ion batteries last longer, charge faster, and store more energy in smaller sizes, making them the most common choice for modern tools.
Nickel-cadmium batteries, although older, are still found in some older DeWalt tools. These batteries require regular use and maintenance to avoid losing power.
Batteries store energy inside cells, which are small compartments that create electrical voltage. Each cell produces a small amount of energy, and multiple cells together give the total power required by the tool.
If one cell fails or loses charge, the whole battery’s performance drops, and tools may stop working even if the battery looks fine from the outside.
Common signs of battery problems include the tool failing to start, the charger showing an error, the battery overheating during charging, or the battery losing charge very quickly.
Recognizing these signs early helps determine whether the battery needs cleaning, resetting, or cell replacement.
Causes of DeWalt Battery Failure
DeWalt batteries fail for several reasons, often due to everyday use or poor handling. Overcharging can damage batteries even if they have automatic shutoff; leaving a battery on the charger for hours can cause heat to build up, weakening the cells.
Deep discharge occurs when a battery is allowed to drain completely before recharging; this can permanently lower its capacity and sometimes prevent it from charging again.
High temperatures, such as leaving batteries in a hot workshop or under direct sunlight, also reduce their lifespan. Physical damage, including dropping the battery or hitting it against hard surfaces, can break internal cells or circuits.
Poor storage is another common cause: storing batteries in damp, wet, or freezing environments reduces performance over time. Understanding these causes helps prevent problems and guides the right method for fixing a battery without causing more damage.
Safety Rules Before Fixing a Battery
Working with batteries requires careful attention because they store electricity and contain chemicals that can be hazardous. Always wear protective gear, such as gloves and eye protection, to avoid injury from sparks or chemical exposure.
Choose a safe work area that is clean, dry, and free of flammable materials. Avoid touching terminals with bare hands or connecting them directly, as this can create a short circuit and dangerous sparks.
Keep all tools nearby, including screwdrivers, a multimeter, and cleaning materials, so the repair process can proceed smoothly. Treat every battery as potentially dangerous until you know it is safe.
Following these safety steps ensures that minor repairs or maintenance do not turn into a bigger problem or cause harm.
Tools Needed to Fix a DeWalt Battery

Several simple tools make battery repair easier and safer. Screwdrivers allow you to open the battery casing carefully, giving access to internal cells. A multimeter is essential for checking voltage and identifying weak or dead cells.
A small brush helps clean battery terminals, removing dust and corrosion that may block connections. A soldering iron can reconnect loose wires or replace cells, though it should be used only by those who know how to handle it safely.
Gloves and safety glasses protect your hands and eyes from potential sparks or sharp edges inside the battery. Preparing all these tools before starting ensures the repair process is smoother, safer, and more efficient.
Step-by-Step Guide to Fix a DeWalt Battery

Step 1: Remove the Battery from the Tool
Always remove the battery from the tool before attempting any repair. Batteries carry a charge, and working on them while attached to a tool can create sparks or short circuits.
Make sure the tool is off and place the battery on a clean, flat surface. This prevents accidents and protects the tool and battery during inspection or repair.
Step 2: Check Battery for Physical Damage
Inspect the battery for cracks, swelling, or leaks. Physical damage may indicate internal cell failure. A swollen battery is dangerous and should not be repaired; it needs replacement.
Minor scratches or small dents are usually safe, but anything that affects the casing integrity should be handled carefully. Identifying physical damage early helps decide whether repair is safe or replacement is required.
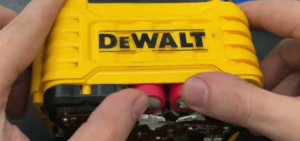
Step 3: Clean Battery Contacts
Dirty contacts prevent the battery from charging or delivering power efficiently. Use a soft brush or cloth to clean both battery and charger contacts.
Avoid water or liquid cleaners because they can cause short circuits. Dirt, dust, and oxidation often reduce performance, so cleaning may restore battery function without replacing any parts.
Step 4: Test Battery Voltage
Use a multimeter to check the battery voltage. Set the multimeter to DC voltage mode and measure across the positive and negative terminals. A fully charged 20V battery should read near 20 volts.
If the reading is significantly lower, the battery may contain weak or dead cells. Voltage testing helps determine whether the problem is minor, like dirty contacts, or more serious, like cell failure.
Step 5: Reset Battery
Some batteries stop charging because of built-in protection circuits. To reset the battery, insert it into the charger and remove it after 10–15 seconds. Repeat this process 2–3 times.
This often clears minor errors in the battery management system. Resetting is safe and can fix a battery that appears dead but has functional cells.
Step 6: Check Individual Cells (Advanced)
Open the battery casing carefully to access the cells. Measure each cell’s voltage with a multimeter. Cells below 2.5 volts usually need replacement. Handle cells carefully to avoid short circuits. This step is more advanced but necessary for diagnosing internal cell problems.
Step 7: Replace Dead Cells
Replace dead cells with new cells of the same type and capacity. Use a soldering iron to reconnect wires securely, ensuring correct polarity. Replacing cells restores battery performance and extends its lifespan. Take your time to avoid damaging nearby cells or circuits during soldering.
Step 8: Reassemble Battery
After repairs, reassemble the battery casing carefully. Tighten screws and make sure the casing closes without gaps. Loose casing can allow dust or moisture to enter, reducing battery life and safety. Proper reassembly ensures the battery functions reliably after repair.
Step 9: Charge Battery Fully
Insert the battery into the charger and allow a full charge. Observe the battery for heat or unusual behavior. A repaired battery may charge normally and hold power for several uses. Check performance by running a tool for a short time before full use.
Common Problems and Solutions
Battery Not Charging
If the battery does not charge, the problem may be dirty contacts, a faulty charger, or dead cells. Clean all contacts carefully. Test the battery in another charger to confirm if the charger is working. Replace any dead cells identified during testing.
Battery Losing Charge Quickly
A battery that drains fast usually contains weak cells or has been exposed to heat. Replacing weak cells and avoiding hot environments helps restore proper performance. Avoid using a damaged battery because it may overheat or fail completely.
Battery Overheating
Overheating can occur from overuse, damaged cells, or poor contact. Allow the battery to cool completely. Check for physical damage or faulty cells. Replace any damaged components before resuming use.
Maintenance Tips to Prevent Future Problems

Charge batteries properly and avoid leaving them in the charger after they reach full power. Store batteries in cool, dry places away from heat and moisture. Regular use prevents deep discharge and maintains cell health.
Avoid letting batteries drain completely before charging. Clean contacts regularly to maintain good electrical connections. Following these practices prevents most battery problems and prolongs battery life significantly.
Signs It’s Time to Replace a Battery

Some batteries cannot be repaired safely. Replace a battery if it shows swelling, leakage, too low voltage even after repair, failure of protection circuits, or frequent overheating.
Attempting to fix these batteries is unsafe and may cause fire, chemical exposure, or damage to tools. Safe replacement is always better than forcing a repair.
FAQs
Can I fix a swollen DeWalt battery?
No. Swollen batteries are unsafe. Replace immediately to prevent risk.
How do I know if a cell is dead?
Use a multimeter. Cells below 2.5V are likely dead.
Can I reset a battery that won’t charge?
Yes. Insert and remove it from the charger 2–3 times to clear minor protection errors.
Can I use a different charger to fix the battery?
No. Use only chargers made for that specific battery type to avoid damage.
Is soldering safe for beginners?
Only if you know proper techniques. Otherwise, seek help.
How long does a repaired battery last?
Depends on the quality of replacement cells and care. With proper handling, it can last months to years.
Conclusion
Fixing a DeWalt battery can save money and extend tool life. Most issues come from dirty contacts, weak cells, or minor protection circuit errors. Simple cleaning, testing, and resetting can fix minor problems.
Replacing dead cells restores performance. Proper handling, storage, and maintenance prevent most issues. Following these steps ensures tools are ready for work safely and reliably while maximizing battery lifespan.