How to Change Reciprocating Saw Blade Makita?
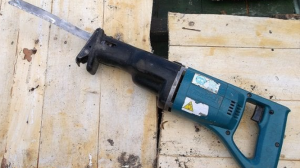
A reciprocating saw helps you cut wood, metal, plastic, and many other materials with speed. A Makita model gives strong performance and steady control, but the blade must stay sharp for the tool to work well.
A dull blade slows each cut. A bent blade shakes the tool. A wrong blade gives rough edges and makes the motor work too hard. Blade changes fix these issues fast.
Many people feel unsure the first time they remove a blade from a reciprocating saw. The tool looks powerful, and the blade looks sharp. The lock system may look confusing.
This fear is normal. A clear guide turns the entire task into a simple routine. Once you understand the steps, the whole job takes less than a minute.
This expanded guide covers everything in detail. You will learn about the blade system, safety, removal steps, installation steps, blade types, and common mistakes.
Each section uses short sentences and easy vocabulary so you can understand every step without stress. You will also see extra tips that improve your cutting performance and help you care for your saw.
A clean method. A safe result. A smooth blade change. Let’s break everything down.
How the Blade System Works on Makita Reciprocating Saws
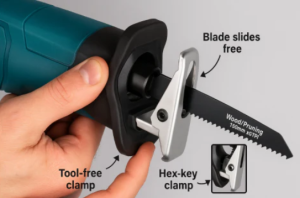
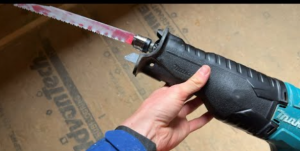
Makita designs its reciprocating saws with a simple, tool-less blade change system. This means you do not need a wrench or screwdriver. Your fingers control the entire process. A small lever or twist collar opens the clamp, and the clamp grips the blade once you release it.
The blade clamp holds the base of the blade inside a narrow slot. This slot has a locking shape that fits the blade’s small cutout. Once the clamp closes, the blade stays firm even during heavy cuts. This system creates a secure connection so the blade does not slip.
Makita saws use two main styles: a lever-style lock and a twist-style collar. Both styles give the same result. You open the lock with your hand, slide the blade in, and release the lock to secure it. This design helps beginners and advanced users because it saves time and reduces mistakes.
This simple clamp also encourages fast blade changes on the job. You can switch from a wood blade to a metal blade in seconds. You can replace a worn blade without stopping the whole project. A clear understanding of this lock system keeps your work smooth and safe.
Why a Fresh Blade Matters

A sharp blade cuts clean and straight. A dull blade fights against the material and forces the motor to work harder. This wastes your time and drains your battery faster. A dull blade also generates heat, which may burn wood or create sparks when cutting metal.
A fresh blade protects your saw. It reduces stress on the motor and keeps the internal gears from overheating. A strong blade also limits vibration, which protects your hands and helps you keep control.
A damaged blade creates safety risks. A bent blade may shake or twist during a cut. A cracked blade may snap under pressure. A rusted blade weakens over time. A quick blade replacement helps you avoid unsafe situations.
A sharp blade improves the quality of your work. Cuts become smoother, straighter, and easier to guide. Your saw feels lighter because the blade does most of the work. A fresh blade always increases efficiency.
Safety First
Safety stays important for all tool users. A reciprocating saw moves a sharp blade at high speed. Respect keeps you protected. A few small steps reduce risk and keep your hands safe during a blade change.
Remove all power before touching the blade. A battery-powered model needs the battery removed. A corded model needs unplugging. This keeps the saw still while you work.
Place your saw on a flat surface. A table or workbench works well. The tool should not roll or slide. A stable saw gives you better control.
Wear gloves if you worry about sharp edges. Gloves protect your fingers from cuts and give extra grip. Make sure the blade feels cool before you touch it. Reciprocating saw blades heat up after cutting.
Keep your workspace bright so you can see the clamp clearly. Good lighting helps you avoid mistakes. Slow down and stay patient. Rushing leads to errors.
A small checklist helps:
-
Disconnect power
-
Keep fingers away from teeth
-
Let the blade cool
-
Hold the saw steady
-
Work in good lighting
-
Check the lock before use
With these steps, you create a safe setup that supports clear and confident actions.
Tools You Need
Makita’s tool-less blade system means you do not need special tools. This makes the entire job simple. Here is everything you need:
-
Makita reciprocating saw
-
New blade
-
Gloves (optional but helpful)
The saw itself includes the locking system. This saves time because you do not need to look for extra tools in your workspace. Even beginners can handle a blade change with ease.
Step-By-Step Guide: How to Change Reciprocating Saw Blade Makita
This expanded guide walks through every step with slow, clear detail. Follow these steps in order.
Step 1: Turn Off the Saw
Power creates risk during a blade change. Remove the battery or unplug the cord. This stops the saw from moving. The saw must stay silent while you handle the blade.
Place the battery in a safe spot so you do not lose it. A cordless saw feels much lighter without the battery, which also gives you better control while replacing the blade.
Step 2: Hold the Saw Steady
Place the saw on a workbench or table. Point the blade side away from your body. Check that nothing moves. A stable tool reduces mistakes because both hands stay free.
Hold the front handle gently to prevent movement. The saw should not rock or shift while you open the clamp.
Step 3: Locate the Blade Clamp
Move your eyes to the front of the saw. You will see a lever or twist collar. This small part controls the blade clamp. Study its shape. Learn how it moves. This helps you work faster during future blade changes.
Some models use a black lever. Some use a silver collar. Both serve the same purpose. Understanding your model makes the whole process easier.
Step 4: Open the Blade Clamp
Hold the lever or collar. Pull or twist it. You will feel a small release. The clamp opens. Keep your fingers steady so the clamp stays open.
You may hear a tiny click when the clamp unlocks. This sound tells you that the blade is ready to come out.
Step 5: Remove the Old Blade
Grip the blade from the base. Slide it straight out. Do not touch the teeth. Even a dull blade can cut skin. Move slowly. Set the old blade aside.
If the blade feels stuck, open the clamp wider or twist it again. Dirt or wood dust may block the blade. A gentle wiggle frees it.
Step 6: Check the Locking Slot
Look at the base of the blade. You will see the locking slot. This small opening allows the clamp to secure the blade. Make sure this slot looks clean. No cracks. No bends. No rust.
This quick inspection helps you understand why a blade may fail during use.
Step 7: Insert the New Blade
Hold the new blade with the teeth pointing in the cutting direction. Most blades cut on the forward stroke, so the teeth should face forward. Slide the blade into the clamp until it stops.
Push the blade with steady pressure. A smooth, straight insertion helps the clamp grab the slot correctly.
Step 8: Release the Lock
Let go of the lever or collar. It snaps back into place. The clamp closes around the blade. Tug the blade gently to check the fit. A secure blade should not move.
This final check prevents accidents during cutting.
Step 9: Reattach Power
Insert the battery or plug the cord back in. Your saw is ready for action. A fresh blade gives smoother cuts and stronger results.
Common Mistakes to Avoid
Small mistakes create big problems. Learn these common errors so you can avoid them.
Wrong Blade Direction
Teeth facing backward or upward slow the cut and damage the material. Always check blade direction before closing the clamp.
Dirty Clamp Area
Dust and debris block the lock mechanism. Clean the clamp with a dry brush to keep it working well. A clean clamp holds blades tighter.
Keeping a Bent Blade
A bent blade shakes the workpiece. This leads to rough cuts and unsafe vibration. Replace bent blades right away.
Using the Wrong Blade
Wood blades cut wood. Metal blades cut metal. Mixed blades cut both. Picking the wrong blade slows the job and stresses the motor.
Forgetting to Remove Power
This creates danger. Always remove power before touching the blade. Safe habits prevent accidents.
Blade Types for Makita Reciprocating Saws
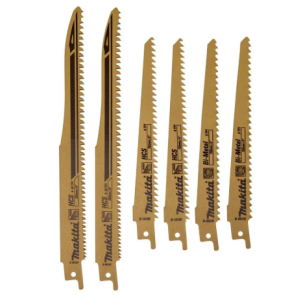
Blade choice shapes your results. Each blade type serves a different purpose. With the right blade, your saw feels smooth and strong.
Wood Blades
These blades have large, sharp teeth. They move fast through lumber, plywood, and branches. Wood blades work best for rough cuts and fast removal.
Metal Blades
Metal blades have small teeth that move slowly but cut steel, copper, nails, and pipes. They give cleaner cuts on hard surfaces.
Demolition Blades
Demolition blades cut through mixed materials like wood with nails, drywall with screws, or old construction boards. They stay tough and resist bending.
Pruning Blades
These blades help with outdoor tasks. They cut tree limbs and shrubs. The teeth stay wide and spaced out to move through bark smoothly.
Clean-Cut Blades
These blades give smooth, neat cuts in wood and soft materials. They reduce splintering and work well for detail cuts.
Specialty Blades
Some blades cut tile, brick, or fiberglass. These blades feel strong and heavy. They handle tough materials without breaking.
How to Choose the Right Blade for Your Task
A correct blade helps you work faster. Use these simple rules:
-
Hard material needs small teeth
-
Soft material needs big teeth
-
Thick material needs a longer blade
-
Smooth cuts need fine teeth
-
Fast cuts need coarse teeth
Think about the job. Think about the material. Pick the blade that matches. This helps your saw last longer and keeps cuts clean.
Extra Tips for Better Performance
Even a good blade needs good handling. Try these tips:
Let the Saw Work
Do not push the saw too hard. Light pressure works best. The blade should cut on its own strength.
Keep Spare Blades
A project slows down when a blade breaks. Keep a few extra blades ready so you never stop halfway.
Clean the Saw Often
Dust builds up fast around the clamp. A clean tool gives better performance and longer lifespan.
Keep Cuts Straight
Avoid twisting the blade during a cut. Twisting causes cracks and breaks. Hold the saw steady and let it move in one direction.
Adjust Speed Wisely
Hard materials need slow speed. Soft materials need fast speed. Proper speed protects your blade.
Signs Your Blade Needs Replacement
Watch for these warning signs:
-
Slow cutting speed
-
Heavy vibration
-
Rough edges
-
Smoke during cutting
-
Sparks during metal cuts
-
Bent or cracked blade
-
Teeth look worn
-
Saw feels like it fights the material
These signs show the blade reached its limit. A quick replacement solves the problem.
How Often Should You Change the Blade?
Blade life depends on the project. A heavy job wears blades faster than a light one. Still, you can follow simple timing:
-
Wood blades last 5–10 hours
-
Metal blades last 2–5 hours
-
Demolition blades last shorter due to mixed materials
Listen to the saw. Feel the blade’s performance. Change blades when the cut slows down or shakes.
What to Do After Removing the Blade
Old blades stay sharp. Handle them safely:
-
Wrap in paper before throwing away
-
Keep away from children
-
Inspect cracks to learn how blades fail
Some places allow metal recycling. Check your local rules if needed.
How to Store Reciprocating Saw Blades
A small box or pouch protects blades from moisture. Moisture creates rust. Keep wood blades, metal blades, and demo blades separate so you pick the right one quickly.
How to Clean the Blade Clamp
Use a brush to clean dust inside the clamp. Move the lever or collar a few times to free stuck particles. A drop of light oil helps the clamp move smoothly.
How to Prevent Blade Slip
Insert the blade fully and check that the locking slot fits into the clamp. Clean dirt from the clamp. A clean clamp prevents blade movement during cutting.
How to Identify Your Makita Model
The model number sits on the side of the saw. This number helps you find the correct manual or replacement parts if needed.
Detailed Breakdown of the Two Lock Systems
Lever-Style Lock
This system uses a small lever. Pull the lever to open the clamp. Insert the blade. Release the lever. The clamp closes instantly. Very fast and simple.
Twist-Style Collar
This system uses a round collar. Twist it to open the clamp. Insert the blade. Release the collar. The collar springs back to lock the blade. Easy for beginners.
Both systems feel smooth once you use them a few times.
Why Makita’s Tool-Less System Helps Beginners
Beginners need a simple method. Makita’s system removes the need for extra tools. No screws. No bolts. No keys. The system stays clean and easy.
Tool-less clamps also help during long jobs. You switch blades fast and keep your work flowing. No wasted time. No stress during blade changes.
This feature builds confidence. You learn your tool better. You work faster and safer with each project.
FAQs
What direction should the blade face?
The teeth should point forward or downward so they cut during the forward stroke. Check the direction before locking the blade.
Can I skip removing the battery during blade changes?
No. Removing the battery keeps you safe. Always remove power before touching the blade.
Can I use any blade brand with my Makita saw?
Yes. Reciprocating saw blades use a standard fitting. Most brands work well with Makita models.
How do I pick the right blade?
Match the blade to the material. Wood needs large teeth. Metal needs small teeth. Mixed material needs a demolition blade.
Why does my blade slip during cutting?
Dust inside the clamp may reduce grip. Clean the clamp and make sure the blade sits fully inside the slot.
Is blade bending normal?
A small flex is normal. A heavy bend is not. A strong bend means too much pressure or the wrong blade type.
Final Thoughts
A smooth blade change keeps your Makita reciprocating saw strong, safe, and ready for steady work. The tool-less clamp system helps you switch blades without stress, and each step becomes easier once you follow the process a few times.
A sharp blade does more than cut faster. It protects the motor, reduces vibration, lowers heat, and gives you cleaner edges on every material. Your hands feel less strain because the saw no longer fights through wood or metal. Fresh blades keep the entire tool balanced.
Good habits support long-term performance. Remove the power before touching the blade. Keep the clamp clean so the lock grips well. Store blades in a dry place to prevent rust. Use the correct blade for the correct material. These small actions help you avoid common mistakes that slow work or damage the saw.
Your projects grow easier when you care for your tools. A simple blade change becomes a normal part of your routine. You gain more control. You save time. You cut with confidence.
A little attention gives you steady results for every job, big or small. With the right blade and proper care, your Makita reciprocating saw stays dependable, powerful, and ready for the next task.