How to Reset a Newer Ryobi 40V Battery – Easy Step-by-Step Guide
The Ryobi 40V battery is a strong and reliable power source for many outdoor tools like lawn mowers, trimmers, chainsaws, and blowers. But sometimes, the battery refuses to charge or stops showing lights on the charger. Many people think the battery is dead and buy a new one. In most cases, the problem is small and can be fixed by doing a reset.
Resetting a Ryobi 40V battery helps clear minor faults inside the battery’s circuit. It also helps the charger recognize the battery again. This guide explains every detail about resetting a newer Ryobi 40V battery, what causes charging problems, and how to make your battery last longer. The steps are written in clear, simple English so anyone can follow easily.
Understanding How the Ryobi 40V Battery Works
A Ryobi 40V lithium-ion battery has several small battery cells inside. These cells store and release energy to power your tool. The battery also includes a “Battery Management System” or BMS. This small circuit protects the battery from:
-
Overcharging
-
Deep discharging
-
Overheating
-
Short circuits
If the battery becomes too hot, too cold, or completely empty, the BMS shuts it off to prevent damage. This safety feature can sometimes make the battery seem dead, even though it’s only in protection mode. Resetting helps wake it up.
Signs That Your Ryobi 40V Battery Needs a Reset
Before doing anything, watch for these common signs:
-
The charger light stays off when the battery is inserted.
-
The charger light blinks red and green but never starts charging.
-
The battery powers the tool for only a few seconds and then stops.
-
The battery shows full charge but doesn’t run any tool.
-
The charger works with other batteries, but not with this one.
These problems often mean the battery protection circuit is locked. A simple reset can help fix this.
How to Reset a Newer Ryobi 40V Battery – Easy Step-by-Step Guide
Step 1: Inspect the Battery and Charger
Start with a quick check. Sometimes, the problem is not the battery.
-
Make sure the power outlet works. Plug in another device to test it.
-
Check that the charger’s power light is on.
-
Wipe the metal contacts on both the battery and the charger using a dry, clean cloth. Dust or corrosion can block the power flow.
-
If possible, try charging another battery. If it charges fine, the issue is with your battery, not the charger.
Step 2: Try a Soft Reset (Wake-Up Method)
A “soft reset” can often bring back a sleeping battery. This process helps the battery’s internal system reconnect with the charger.
Follow these steps:
-
Insert the battery into the charger and leave it for 3–5 seconds.
-
Remove it again.
-
Repeat this process about 5 to 10 times.
This helps the charger send short bursts of power, which may wake up the internal circuit. If the charger light starts blinking red, the reset worked, and the battery is charging again.
Step 3: Use the Jump-Start Method (For Dead Batteries)
If the soft reset doesn’t work, try the “jump-start” method. This works for batteries that have completely lost power and are not recognized by the charger.
You’ll need:
-
One fully charged Ryobi 40V battery (same model)
-
One dead Ryobi 40V battery
-
Two small insulated wires
Steps:
-
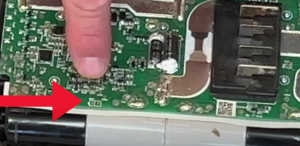
Identify the positive (+) and negative (–) terminals on both batteries.
-
Use one wire to connect the positive terminal of the charged battery to the positive terminal of the dead battery.
-
Use the second wire to connect the negative terminal of both batteries.
-
Hold the wires in place for about 5–10 seconds.
-
Remove the wires carefully.
-
Place the dead battery on the charger.
The charger should now detect it and begin charging. If the light turns red, leave it to charge until it turns green.
Safety tip: Always make sure the wires do not touch each other or cross. Do not hold the connection for longer than 10 seconds.
Step 4: Let the Battery Fully Recharge
Once the battery starts charging, allow it to reach a full charge before using it again. Avoid removing it early. A full charge helps the cells balance and improves performance. A complete charge may take 60 to 90 minutes depending on your charger type.
Troubleshooting Tips After Reset
Sometimes, the battery still acts strange even after a reset. Try these quick checks:
-
Blinking red light: Battery is too hot or too cold. Let it sit at room temperature for 30 minutes, then try again.
-
Solid red light but no green: The charger is working, but the battery is very low. Wait for a while; it may take time before the green light shows.
-
No light at all: The battery may have a broken internal connection or damaged cells. Take it to a Ryobi service center.
Common Causes of Ryobi 40V Battery Failure
A few simple habits can cause the battery to fail early:
-
Running the battery until it’s fully empty every time.
-
Storing it in direct sunlight or freezing temperatures.
-
Leaving it in the charger for many hours after charging.
-
Using it with wet or dirty contacts.
-
Long storage without charging.
Understanding these issues helps prevent future battery problems.
Tips to Keep Your Ryobi 40V Battery Healthy
Charge Regularly
Recharge the battery after every use. Don’t wait until it’s completely dead. Partial charging helps maintain cell health.
Store Properly
Keep the battery in a dry, cool place. The ideal storage temperature is between 10°C and 25°C (50°F to 77°F).
Avoid Overcharging
Once the light turns green, remove the battery from the charger. Leaving it connected for days can shorten its lifespan.
Clean the Terminals
Dirt and corrosion can block the connection. Wipe the terminals once in a while with a soft cloth.
Use the Original Charger
Always use the Ryobi charger that came with your tool. Using a different brand can damage the battery.
Extra Maintenance Tips
-
Charge the battery to about 50% if you plan to store it for more than a month.
-
Never open or try to repair the battery yourself. It can be dangerous.
-
Avoid dropping or shaking the battery. The internal cells are delicate.
-
Label your batteries if you have several. Rotate their use to keep them in balance.
FAQs
Q1: Why won’t my Ryobi 40V battery charge even after reset?
The internal cells might be too weak or damaged. Visit a Ryobi service center for testing.
Q2: How long does a Ryobi 40V battery last?
Most Ryobi 40V batteries last 3–5 years with proper care and storage.
Q3: Can I charge my Ryobi 40V battery overnight?
It’s not recommended. Remove it after it turns green to avoid overcharging.
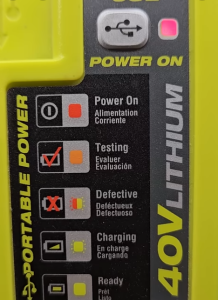
Q4: Why does my Ryobi charger flash red and green lights?
This means the charger is trying to analyze or balance the battery. It’s normal during the reset or early charging phase.
Q5: Is the jump-start method safe?
Yes, if done carefully. Do not let the wires touch or connect for more than 10 seconds. Always use insulated wires.
Q6: Can cold weather stop my battery from charging?
Yes. Lithium-ion batteries charge poorly in cold temperatures. Let the battery warm to room temperature before charging.
Conclusion
A Ryobi 40V battery that won’t charge doesn’t always mean it’s dead. Most of the time, it just needs a simple reset to wake up its internal system. Cleaning the terminals, doing a soft reset, or using a quick jump-start can help bring it back to life.
Regular care, proper charging habits, and good storage make a big difference. Following these easy steps can extend your battery’s life and keep your Ryobi tools running strong season after season.


