How To Wind Ryobi String Trimmer?
A Ryobi string trimmer cuts grass, weeds, and thick edges with a thin line that spins fast. That line wears down while you work. A fresh line keeps the trimmer strong, smooth, and ready for any corner of your yard.
Many people feel stressed about winding the spool. The line slips. The spool jams. The head pops off. You lose track of the arrows. You get confused about the right length.
This guide gives you a slow and friendly walk-through. No pressure. No tough words. Every piece of the job breaks into small steps. You see how to remove the spool, cut the line, wind the line, feed the ends, and place it back with the right tension.
You also learn why the line matters, why the direction matters, and how the wrong pattern creates bumps and shakes in the head.
You also get two paths:
• one for single-line Ryobi heads
• one for dual-line Ryobi heads
Both styles appear in many Ryobi models, so this guide helps with almost any trimmer in the lineup.
Every step uses clear sentences. No complex terms. No tricky grammar. You get the full picture in simple language.
UNDERSTANDING YOUR RYOBI STRING TRIMMER
A strong start builds confidence. So you begin by learning what part does what. Once you know the parts, winding the line becomes easy.
What the Head Does
The head sits at the bottom of the shaft. It holds the spool. The line comes out in one or two small openings. The head also spins along with the motor. A fast spin creates a cutting path. A slow spin helps you trim tight edges.
A clean head spins steady without shakes. A clogged head shakes too much. Dirt, grass, and melted line often cause this. So a good winding job supports the health of the head.
What the Spool Does
The spool sits inside the head. It holds the line wrapped in a clean pattern. A good pattern feeds the line out clean and straight. A messy pattern grabs the line and traps it inside the spool.
Many people think the spool is just a container, but the truth is simple: a good spool pattern decides how well the trimmer cuts.
What the Bump Feed Does
Most Ryobi trimmers use a bump-feed system. You tap the head on the ground. The tap unlocks the spool for a second. The line slips forward. You get more length without stopping. That system needs a clean winding pattern. If the pattern is wrong, the bump feed stops working.
Why Line Size Matters
Ryobi trimmers work with different line sizes. Some use a thin line. Some use a thick line. The wrong size creates stress on the head. The right size gives smooth cutting power.
Common sizes include:
| Line Size | Use |
|---|---|
| 0.065″ | Light trimming, short grass |
| 0.080″ | Medium grass and thicker edges |
| 0.095″ | Tough weeds, thicker areas |
A thick line needs more room. A thin line needs tight winding. So the right size helps the job feel easy.
HOW TO PREP BEFORE WINDING
Most people skip prep. They rush. They pull the line. They push the spool back. Then the line jams. Good prep stops that.
Check Your Spool Type
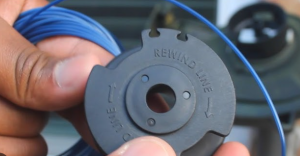
You find the spool type printed on the head. Some Ryobi heads use a simple single-line spool. Some use two channels.
• Single-line heads have one groove around the spool.
• Dual-line heads have two separate channels, often shaped like a “Y” or “8.”
Knowing the type saves time later.
Get the Right Line Length
Long enough to fill the spool but short enough to stay clean.
Good rule: 12–20 feet for single-line. 10–16 feet per channel for dual-line.
Short line means you run out fast. Long line means the head jams. A balanced length gives safe feeding.
Clean the Head
Dirt hides inside the head. A small stick or brush helps you move it out. A clean head gives a smooth path for the line.
Inspect the Bump Knob
The knob must turn clean. It should click or spin without a fight. A stuck knob stops the feed.
Cut the Line Clean
Cut the line with sharp scissors. A clean cut slides into the anchor point without struggle.
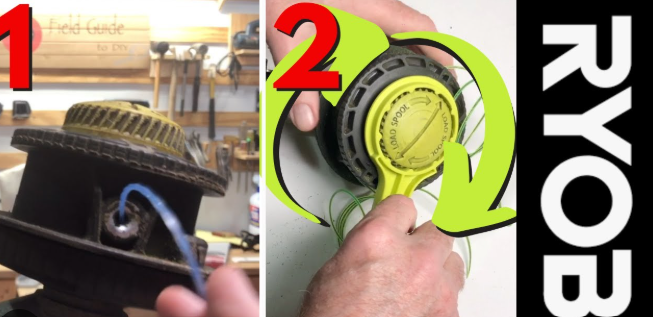
REMOVING THE SPOOL
This part feels scary for many people, so you get a slow and calm walk-through. Take your time.
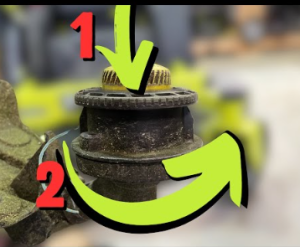
Step 1: Lay the Trimmer on the Ground
Place it on a flat surface. Keep the head facing you. This gives a clear view of the latches.
Step 2: Press the Side Tabs
Most Ryobi heads use two side clips. Press them. The cover pops up. If the clips feel tight, press one side first, then the other.
Do not force the cap. A small press works fine.
Step 3: Lift the Cover
The cover lifts straight up. Slow movement stops the spring inside from shifting.
Step 4: Pull the Spool Out
Lift the spool from the center post. The line ends may still be placed in the eyelets. Slide them through as you lift.
Step 5: Remove Old Line
Old line grows brittle. It breaks fast. Pull it out fully.
WINDING A SINGLE-LINE RYOBI TRIMMER

Now the real work starts. This part covers the single-line style in a slow and simple way.
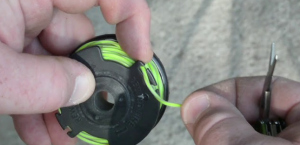
Step 1: Find the Anchor Hole
One small hole sits near the center of the spool. This hole grabs the line and holds it steady.
Step 2: Insert the Line
Push one end through the anchor hole. Pull it until around ½ inch stays inside the hole.
Step 3: Follow the Arrows
Arrows show the winding direction. Follow those arrows exactly. Any other direction creates knots.
Step 4: Wind the Line Tight and Even
Lay the line in a smooth pattern. Each wrap sits next to the previous one.
Tips:
• keep steady pressure
• avoid overlap
• guide the line with one hand
• turn the spool with the other hand
A good winding pattern looks like a stack of coins.
Step 5: Leave 6–8 Inches Free
Once you reach the end, stop. That free tail feeds through the head later.
Step 6: Lock the Line
Some spools have locking grooves. Place the tail inside the groove. It stops the line from springing loose.
WINDING A DUAL-LINE RYOBI TRIMMER (SLOW, SIMPLE, CLEAR)
Dual-line spools need more attention. You have two channels and two lines. Both must stay equal.
Step 1: Divide Your Line
Cut two equal pieces. Both around 10–16 feet.
If lengths differ, feeding becomes messy.
Step 2: Insert the First Line
Place the first piece into the first anchor point. Pull until ½ inch remains inside.
Step 3: Follow the Arrow for Channel One
Wind the first channel slow and clean. Keep each wrap tight and straight.
Step 4: Lock the First Line
Place the tail in the groove.
Step 5: Insert the Second Line
Place the second line into the second anchor point the same way.
Step 6: Follow the Arrow for Channel Two
Wind the second channel in the direction shown on the spool.
Step 7: Leave Both Tails Loose
Keep 6–8 inches for each tail.
HOW TO REATTACH THE SPOOL BACK INTO THE HEAD
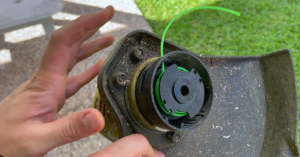
This part explains how to place the spool back. Many people struggle at this stage. The line slips. The spool pops out. The cap does not lock. Small mistakes create big frustration. So you get a slow explanation you can follow step by step.
Step 1: Hold the Spool in One Hand
Keep the spool at eye level. Hold it in a steady grip. Make sure the free line tail does not slip out of the groove. If it slips, place it back before moving ahead.
Step 2: Guide the Line Through the Eyelet
Your trimmer head has one or two small holes on the sides. These are called eyelets. Pull the free end of the line through the eyelet before placing the spool inside.
Do this slow. A smooth pull prevents the line from rubbing the plastic and weakening.
For dual-line trimmers: feed each tail into its own separate eyelet.
Step 3: Lower the Spool Into the Head
Place the spool straight down into the head. Aim the center hole of the spool over the center post inside the head.
A clean fit feels natural. You do not need to force it. The spool should slide into place with a small click or gentle seat.
Step 4: Pull the Line Gently
A slow pull tests the tension.
• If the line moves smoothly, the winding pattern is correct.
• If it catches, you may have overlapped some wraps.
• If the line snaps back inside, the locking groove may not be holding it.
Fix any issue before closing the cap.
Step 5: Reattach the Cap
Place the cap over the spool. Press the sides until the latches snap into place. A small click confirms the lock.
If the cap does not close, the spool may not sit fully on the post. Remove it, check alignment, and set it again.
Step 6: Check the Spool Height
The spool should sit level with the rim of the head.
If it sits too high, the cap will not close.
If it sits too low, the line may not feed right.
Take a moment and double-check this. A clean setup saves trouble later.
ADJUSTING THE LINE LENGTH FOR A CLEAN CUT
A Ryobi trimmer cuts best with the right line length. Too long means the motor strains. Too short means weak cutting power. Many people forget this part, but it makes a huge difference.
Why Line Length Matters
A long line drags against the guard. That rub damages the line and weakens the motor. A short line leaves patches of grass behind. A balanced length gives you a clean cut with less effort.
Find the Line Cut Blade
Ryobi trimmers include a small metal blade on the guard. This blade trims extra line to the perfect length. You see it as a small angled piece near the bottom edge of the guard.
Step-by-Step Length Check
-
Hold the trimmer a few inches off the ground.
-
Pull the line outward from the eyelets.
-
Make sure the line reaches the blade but does not go beyond it.
-
If the line extends too far, rotate the head so the blade can trim it.
-
If the line sits too short, tap the bump knob to release more.
Bump Feed Tips
• Tap the head lightly, not hard.
• Tap on flat ground.
• Tap while the head spins at full speed.
• Tap only one or two times.
Too many taps release too much line. This causes waste and friction.
TROUBLESHOOTING COMMON LINE ISSUES
Even with careful winding, problems may happen. These issues are common, especially with beginners. Here you get clear solutions written in slow, simple language.
Problem 1: Line Not Feeding Out
This happens when the line overlaps or the spool sits uneven.
Fix
• Remove the cap.
• Pull the spool out.
• Check for crossed lines.
• Rewind the line with tight, even wraps.
• Reset the spool and try again.
A clean pattern always solves this problem.
Problem 2: Line Feeds Too Much
This happens when the locking groove does not hold the tail before reassembly.
Fix
• Remove the spool.
• Place the tail in the locking notch.
• Make sure it sits firm.
• Reinstall the spool.
A secure tail gives proper feeding.
Problem 3: Line Breaks Too Fast
Several reasons:
• Old line
• Cheap line
• Wrong size
• Sharp edges inside the head
• Thick weeds that heat the line
Fix
• Use fresh line from a sealed pack.
• Pick the correct diameter.
• Clean the eyelets.
• Trim tall weeds in small passes.
A sharp bend or melted line often signals overheating.
Problem 4: Head Vibrates Too Much
This points to an uneven winding pattern or dirt inside the spool area.
Fix
• Remove the spool.
• Clean the inside of the head.
• Rewind the line clean and tight.
Balanced wraps make the head spin smooth.
Problem 5: Spool Pops Out While Cutting
This means the cap did not lock correctly.
Fix
• Check for broken clips.
• Press the cap until both sides click.
• Make sure the spool sits flush on the center post.
If the clips wear out, the cap must be replaced.
Problem 6: Line Melts Inside the Spool
Fast spinning heats low-quality line. The melted sections stick together.
Fix
• Use a better-quality line.
• Avoid cutting thick brush at full speed for long stretches.
• Take short breaks to cool the head.
Problem 7: String Winds Unevenly After a Few Uses
This often happens when you bump the head too hard on concrete.
Fix
• Tap only on soil or grass.
• Use lighter taps.
• Rewind the spool if the pattern looks uneven.
Small habits change the whole performance.
TIPS FOR SMOOTHER WINDING AND LONGER LINE LIFE
These tips help you get more life out of your line and more comfort while working.
Tip 1: Keep the Line Straight Before Winding
A twisted line creates bumps. Lay the line on the ground and pull it straight before winding.
Tip 2: Warm the Line Slightly
Some users stretch the line gently. A warm line bends easier and wraps smoother. Do not heat it with tools. Your hands are enough.
Tip 3: Avoid Sharp Bends
Sharp bends weaken the line. Soft curves keep the line strong.
Tip 4: Do Not Overfill the Spool
Too much line stops the bump feed. Leave a small gap at the top of the spool.
Tip 5: Replace the Line Regularly
Old line turns white and brittle. Refreshing the line gives better cutting power.
Tip 6: Clean the Guard Weekly
Grass builds up around the blade and the guard. Clear it. A dirty guard causes friction.
Tip 7: Pick the Right Line Size
Using the right diameter always improves cutting and feeding.
SAFETY TIPS WHILE WINDING AND USING A RYOBI TRIMMER
A trimmer looks simple, but the spinning line cuts fast. These safety tips help you stay safe while working.
Tip 1: Remove the Battery Before Winding
Always remove the battery before opening the head.
This removes all risk of accidental activation.
Tip 2: Wear Safety Glasses
Small rocks fly fast. Protect your eyes.
Tip 3: Wear Gloves While Winding
The line is not sharp, but long winding can irritate your fingers.
Tip 4: Clear the Ground Before Cutting
Remove stones, metal, small branches, and debris.
A clean yard means fewer line breaks.
Tip 5: Keep Pets and Kids Away
A spinning line can throw objects with force.
Tip 6: Hold the Trimmer Properly
Use two hands. Keep the head level.
A stable grip cuts fast and safe.
FAQs
Why does my Ryobi trimmer keep breaking the line?
Old line breaks fast. Thin line snaps under stress. Sharp edges in the cutting area also weaken the line.
How often should I rewind the spool?
Rewind once the line drops below two inches. Long lines work better. Very short lines cause stress in the head.
Can I use any brand of trimmer line?
Yes, as long as the diameter matches Ryobi’s recommended size.
Why does the spool get hot?
Friction builds inside messy coils. Proper winding prevents heat.
What is the best line type?
A simple round line lasts longest and feeds most reliably.
Can the wrong winding direction damage the head?
Yes. Backward winding causes binding. Binding ruins the bump feed.
CONCLUSION
A Ryobi string trimmer works best with a clean, tight, and well-organized spool. Good winding keeps the feed smooth. Good winding keeps the motor steady. Good winding saves time during yard work.
The full process looks long, but each step becomes easier with practice. A few sessions help you understand the right tension, the right spacing, and the right length for your cutting needs. Once you get comfortable with this routine, your trimming sessions feel faster, smoother, and far more reliable.