How To Fix Dewalt Batteries?
DeWalt batteries power tools in homes, workshops, and construction sites. A dead battery stops work instantly. Losing charge can frustrate users. Batteries fail for many reasons. Improper storage, old age, overheating, or overuse can cause problems.
Some batteries fail slowly. Others stop working suddenly. Understanding battery issues saves time and money. Fixing a DeWalt battery often restores performance. Knowing safe steps prevents accidents.
This guide explains every detail. Users will learn why batteries fail, how to test them, and how to restore performance. Beginners and experienced users benefit. Step-by-step instructions make troubleshooting easy.
Understanding DeWalt Batteries

Types of DeWalt Batteries
DeWalt uses different battery types for its tools:
-
NiCd (Nickel-Cadmium): Older models. Less common today. Memory effect reduces capacity over time.
-
NiMH (Nickel-Metal Hydride): Rare. Improved energy density. Sensitive to heat.
-
Li-ion (Lithium-Ion): Modern tools. Lightweight. High energy capacity. Less memory effect. Sensitive to overcharging and overheating.
Most DeWalt batteries today use Li-ion technology. These batteries provide more power and longer runtime than older NiCd types.
How DeWalt Batteries Work
Each battery has cells connected in series or parallel. Each cell stores electrical energy. Voltage and capacity depend on cell number. A battery also has a Battery Management System (BMS). BMS protects cells from overcharge, over-discharge, and overheating. A damaged BMS often causes the battery to fail, even if the cells are good.
Common Signs of a Faulty DeWalt Battery
-
Tool stops working suddenly.
-
Battery fails to charge fully.
-
Charger lights flash red or blink.
-
Battery feels unusually hot.
-
Runtime decreases quickly.
-
Battery case feels swollen or damaged.
Spotting these signs early can prevent complete battery failure.
Safety First
Why Safety Matters
Batteries store electricity. Mishandling can cause sparks, fire, or chemical leaks. Lithium-ion batteries are especially sensitive. Old or swollen batteries are dangerous. Safe handling reduces risk.
Protective Measures
-
Wear safety glasses and gloves.
-
Work on a flat, non-conductive surface.
-
Avoid shorting battery terminals.
-
Keep water and liquids away.
-
Avoid metal tools that touch battery contacts directly.
Safety comes before any troubleshooting or repair.
Common Reasons DeWalt Batteries Fail

Deep Discharge
Letting a battery discharge too low can damage cells. Li-ion batteries lose capacity if stored fully drained for long periods. Always charge before long storage.
Overheating
Excess heat reduces battery life. Running tools continuously without rest generates heat. Charging in hot environments also affects performance. Heat may cause swelling or cell damage.
Poor Storage
Batteries stored in very cold or hot conditions degrade faster. Storing fully charged batteries for months reduces lifespan. DeWalt recommends storing batteries at around 40–60% charge in cool conditions.
Age and Usage
Every battery has a lifespan. Heavy daily use reduces cycle life. Older batteries lose capacity even with proper care.
Faulty Charger
Sometimes the charger is the problem, not the battery. Damaged chargers may fail to deliver proper voltage. Check the charger before troubleshooting the battery.
BMS Problems
Battery Management Systems can fail. BMS failure prevents the battery from charging. Some batteries appear dead even when cells are functional.
Tools and Materials Needed to Fix a DeWalt Battery

Basic Tools
-
Multimeter for testing voltage.
-
Small screwdriver set (usually Phillips or Torx).
-
Needle-nose pliers.
-
Soldering iron (for cell replacement, optional).
-
Safety gloves and goggles.
-
Lithium-ion safe charging station or smart charger.
Optional Supplies
-
Replacement Li-ion cells (18650 or compatible type).
-
Electrical tape or heat shrink tubing.
-
Battery case adhesive for reassembly.
Step 1: Testing the Battery
Checking the Charger
Before opening the battery, check the charger.
-
Plug in the charger and battery.
-
Observe lights:
-
Solid green = fully charged
-
Flashing red = error or problem
-
Blinking amber = charging in progress
-
Try another battery in the charger. If it charges, the charger works fine. If not, the charger may need repair.
Measuring Voltage with a Multimeter
-
Set multimeter to DC voltage.
-
Place probes on positive and negative terminals.
-
Compare measured voltage with the battery rating (e.g., 20V battery).
-
Voltage significantly below rated value may indicate deep discharge or dead cells.
Example: A 20V battery reads 14V. This battery may need cell-level troubleshooting.
Step 2: Resetting a DeWalt Battery
Some DeWalt batteries enter protective mode due to over-discharge or overheating. Resetting can restore functionality.
Steps to Reset
-
Remove battery from tool.
-
Disconnect from charger.
-
Wait 15–30 minutes for internal protection circuits to reset.
-
Reinsert into charger.
-
Observe charging lights.
This step works if the BMS temporarily blocked charging.
Step 3: Cleaning Battery Contacts
Dirt or oxidation can prevent charging.
How to Clean
-
Remove battery from tool and charger.
-
Inspect metal contacts for rust, dirt, or corrosion.
-
Use a clean cloth or fine sandpaper to wipe contacts gently.
-
Do not sand too hard or remove metal.
-
Reinsert battery and test charging.
Clean contacts often restore charging without further repair.
Step 4: Cell-Level Testing and Replacement
If voltage is low or capacity is reduced, cells may fail.
Opening the Battery Case
-
Remove screws carefully.
-
Open the plastic shell. Avoid damaging wiring.
-
Note cell arrangement and wiring for reassembly.
Testing Individual Cells
-
Each Li-ion cell usually has 3.6V nominal voltage.
-
Use a multimeter to measure each cell.
-
Cells under 3.0V may be damaged.
-
Cells that do not hold voltage need replacement.
Replacing Cells
-
Match replacement cells with original type (e.g., 18650 Li-ion).
-
Solder carefully, maintaining correct polarity.
-
Connect all cells in the same series/parallel arrangement.
-
Reattach BMS connections.
Testing After Replacement
-
Measure overall battery voltage.
-
Insert battery into charger.
-
Observe charging lights and runtime on a tool.
Step 5: Balancing Cells
Li-ion batteries require balance. Uneven charge reduces lifespan.
-
Use a smart charger that balances cells automatically.
-
Charging each cell to full voltage ensures even performance.
-
Repeat cycle once or twice to stabilize the battery after replacement.
Step 6: Reassembling the Battery
-
Place cells and BMS back in the plastic shell.
-
Ensure wires are not pinched.
-
Screw the case tightly but do not overtighten.
-
Test battery on tool.
A secure shell prevents shorts and protects cells.
Step 7: Testing and Maintenance After Fixing
Full Charge Test
-
Charge battery fully.
-
Check for correct voltage and runtime.
Tool Performance Test
-
Insert battery into tool.
-
Run tool under normal load.
-
Confirm runtime and power match expectations.
Regular Maintenance
-
Store partially charged.
-
Avoid extreme temperatures.
-
Avoid over-discharging.
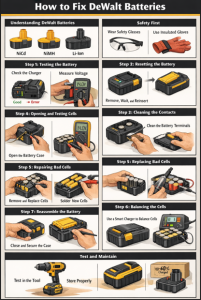
Diagram Of Fixing DeWalt batteries step by step
Signs You Cannot Fix a Battery
-
Swollen or leaking battery case.
-
Damaged or melted wires.
-
BMS completely burned or missing protection.
-
Multiple dead cells in a large battery pack.
In these cases, replacement is safer than repair. Safety outweighs cost.
Tips to Extend DeWalt Battery Life
-
Use the right charger.
-
Avoid full discharge before recharging.
-
Keep battery cool during use.
-
Remove battery from tool after use.
-
Store at 40–60% charge for long periods.
-
Avoid dropping or puncturing the battery.
Following these steps reduces repairs and prolongs battery life.
Common Battery Problems and Solutions
| Problem | Possible Cause | Solution |
|---|---|---|
| Battery won’t charge | Charger problem | Test charger, try another battery |
| Tool runs briefly | Dead cells or BMS | Replace cells, check connections |
| Charger light blinks red | Overheating or BMS lock | Cool battery, reset, retry |
| Swollen battery | Heat or old age | Do not use, dispose safely |
| Tool loses power quickly | Uneven cells | Replace weak cells, balance pack |
FAQs
Can I fix a swollen DeWalt battery?
No. Swollen batteries are unsafe. Do not attempt to fix. Dispose at a proper recycling center.
How long do DeWalt batteries last?
Battery lifespan varies. Heavy users may see 2–3 years. Proper storage can extend life.
Will replacing cells void warranty?
Yes. Opening or replacing cells voids warranty. Repair is only recommended for out-of-warranty batteries.
Can I repair a Li-ion battery at home safely?
Yes, with proper tools, safety gear, and knowledge. Avoid damaged or swollen batteries.
Why does my battery heat up while charging?
Normal heat is common. Excessive heat may indicate failing cells or BMS issues.
How can I know which cell to replace?
Use a multimeter to check individual voltage. Cells under 3.0V or not holding charge need replacement.
Can using the wrong charger damage the battery?
Yes. Using incompatible voltage or current can harm cells and BMS.
Why does the battery show full charge but tool runs briefly?
Cells may be unbalanced or weak. Replacement or balancing may restore runtime.
Conclusion
Fixing DeWalt batteries requires patience and care. Safety is the first priority. Many problems come from BMS, dead cells, or dirty contacts. Testing with a multimeter helps identify faulty parts. Resetting, cleaning, or replacing cells often restores performance.
Smart chargers and cell balancing improve longevity. Some batteries are too damaged to repair safely. Proper storage and regular maintenance prevent future issues.
Understanding battery operation, common faults, and safe repair practices helps users save money and avoid accidents. A well-maintained battery delivers consistent power, longer runtime, and safer operation. Following these steps ensures tools stay ready for work every day.