How to Change a Drill Bit on a Ryobi Drill
A Ryobi drill is one of the most trusted tools for home repairs, furniture work, and DIY projects. It’s compact, powerful, and easy to control. The drill can handle many jobs, from driving screws to drilling holes in wood, metal, or concrete. But to use it effectively, you need to know how to change the drill bit properly.
Many beginners struggle with this small but important task. A loose or incorrectly fitted bit can lead to crooked holes, worn-out tools, or even injuries. Changing a drill bit is simple once you know the right steps.
This guide explains the process clearly, using simple language and step-by-step instructions. By the end, you’ll feel confident changing bits on any Ryobi drill—cordless or corded.
Understanding the Role of the Drill Bit

The drill bit is the part that does the cutting. It rotates at high speed to make holes or drive screws. Different jobs need different drill bits. For example, a wood bit cuts clean holes in boards, while a masonry bit cuts through hard materials like brick.
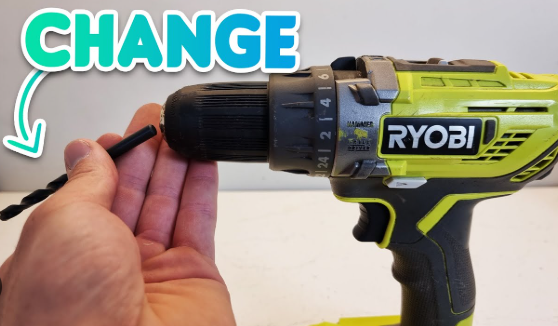
The chuck holds the drill bit in place. It sits at the front of the drill and has three jaws that open and close around the bit. Most Ryobi drills use a keyless chuck, which means you can tighten or loosen it by hand. Some older models use a keyed chuck, which needs a small tool called a chuck key.
Understanding these two parts—the bit and the chuck—is the key to changing bits correctly.
Preparation Before Changing the Bit
Good preparation keeps your work safe and smooth. Follow these steps before replacing your drill bit.
Step 1: Power Off the Drill
Always turn off the drill before touching the chuck or bit. For cordless models, remove the battery pack. For corded ones, unplug the power cord. This small step prevents accidental spinning while you work.
Step 2: Clean the Chuck
Dust, sawdust, or dirt inside the chuck can stop it from gripping the bit tightly. Wipe it clean with a dry cloth or use a small brush to remove debris.
Step 3: Inspect the Bit and Chuck
Check that the bit you’re removing is not bent or worn out. Also, look at the chuck jaws. They should move evenly and not be rusted or damaged.
Step 4: Pick the Correct Replacement Bit
Select a new bit based on your project. The bit’s shank (the end that fits into the chuck) should match your drill’s size. Most Ryobi drills use a 3/8-inch or 1/2-inch chuck, which fits most standard bits.
How to Change a Drill Bit on a Ryobi Drill

For Keyless Chuck Models
-
Hold the Drill Firmly
Grip the drill body with one hand to keep it steady. -
Loosen the Chuck
Turn the chuck sleeve counterclockwise (to the left). You’ll feel the jaws start to open. Keep twisting until the bit feels loose. -
Remove the Old Bit
Pull the old bit straight out. Don’t twist or bend it. Set it aside safely, especially if it’s still warm from use. -
Insert the New Bit
Place the new bit into the center of the chuck. Push it in until the shank is deep enough to hold steady but not touching the jaws’ base. -
Tighten the Chuck
Turn the chuck clockwise (to the right) until it grips the bit firmly. Keep tightening until it feels snug. You should hear a few clicks or feel resistance. -
Check the Alignment
Make sure the bit is straight and centered. A tilted bit can make rough holes or damage the chuck. -
Test for Security
Give the bit a small tug. It shouldn’t move or wobble. If it does, tighten it again. -
Reattach Power
Insert the battery or plug the cord back in. Your Ryobi drill is ready for use.
For Keyed Chuck Models
-
Insert the chuck key into one of the holes on the side of the chuck.
-
Turn the key counterclockwise to loosen the jaws.
-
Pull out the old bit carefully.
-
Insert the new bit into the center. Make sure it’s straight.
-
Turn the chuck key clockwise to tighten the jaws around the bit.
-
Check the bit by pulling it slightly. If it stays firm, it’s ready for use.
Keyed chucks are rare in newer Ryobi drills, but some older or heavy-duty models still use them.
How to Change a Drill Bit Without Tools
All modern Ryobi drills come with keyless chucks. That means no tools are needed for changing bits. Just hold the chuck firmly with one hand and twist the sleeve in the opposite direction with your other hand. It’s quick and easy.
If the chuck feels stiff, try running the drill slowly in reverse while holding the chuck to loosen it slightly. Then, remove the bit as usual.
Tips for Better Results
-
Always insert the bit straight, not at an angle.
-
Don’t overtighten the chuck—it may wear down the jaws.
-
Keep bits clean and dry to prevent rust.
-
Remove bits after each project to avoid them getting stuck.
-
Use a soft cloth to wipe the bit before inserting it.
-
Never change bits while the drill is powered.
Following these small tips improves both safety and tool life.
How to Choose the Right Drill Bit
Different materials need different drill bits. Using the wrong one can damage your drill or ruin your work.
| Material | Recommended Bit Type | Description |
|---|---|---|
| Wood | Twist Bit / Spade Bit | Cuts clean holes in soft and hardwood. |
| Metal | High-Speed Steel (HSS) Bit | Designed for steel, aluminum, or brass. |
| Concrete / Brick | Masonry Bit | Has a carbide tip to handle hard surfaces. |
| Plastic | Twist Bit | Works best at low speed to prevent melting. |
| Glass / Tile | Diamond or Carbide Tip Bit | Needs slow speed and gentle pressure. |
Always double-check the label on the bit before use.
Common Mistakes and How to Avoid Them
Mistake 1: Forgetting to remove power
This is dangerous. Always remove the battery or unplug before touching the chuck.
Mistake 2: Over-tightening the chuck
This can damage the drill’s internal parts. Tighten it just until it feels secure.
Mistake 3: Using a dirty or rusty bit
Old bits can break or slip. Clean them regularly and replace dull ones.
Mistake 4: Leaving the bit inside for too long
Bits can get stuck in the chuck if left for days. Remove and store them after use.
Mistake 5: Not checking alignment
A crooked bit can cause rough holes or vibration. Always check it before drilling.
Maintenance Tips for Your Ryobi Drill
-
Wipe the drill body and chuck after every use.
-
Keep the chuck jaws clean and oiled lightly to prevent rust.
-
Store bits in a small case or container to avoid damage.
-
Charge batteries only when needed; overcharging can reduce life.
-
Keep the drill in a dry area away from dust and moisture.
Proper care keeps your Ryobi drill working like new for years.
Troubleshooting Common Problems
Problem: The chuck won’t open
Try running the drill in reverse for one second while holding the chuck sleeve. This should loosen it.
Problem: The bit keeps slipping
Tighten the chuck more or replace worn-out bits. If it continues, the chuck jaws may need cleaning.
Problem: Bit stuck inside the chuck
Grip the bit with pliers and turn the chuck gently. Don’t force it. A few drops of oil can help loosen it.
Problem: The drill vibrates too much
The bit might not be centered. Remove it and insert again carefully.
Safety Tips
-
Always wear safety glasses while changing bits.
-
Keep fingers away from the trigger area.
-
Never hold the drill by the bit or chuck during operation.
-
Avoid using wet hands when handling electric tools.
-
Make sure the drill is on a stable surface before changing bits.
FAQs
1. Do all Ryobi drills have keyless chucks?
Most modern Ryobi drills do, but some older models still use a keyed chuck.
2. How tight should the bit be?
Tight enough that it doesn’t move when you pull lightly. It shouldn’t feel loose or wobbly.
3. Can I use any brand of drill bits?
Yes. Most standard bits fit Ryobi drills, as long as the shank size matches your chuck.
4. What should I do if my bit gets stuck?
Try turning the chuck counterclockwise while holding the bit gently. Add a drop of oil if needed.
5. Why does my chuck feel stiff?
Dirt or sawdust may be inside. Clean it with a brush or cloth and apply a small drop of oil.
6. How often should I change bits?
Change them whenever they get dull, rusty, or chipped. A sharp bit cuts cleaner and faster.
7. Can I use the same bit for wood and metal?
No. Each material needs its own type of bit for clean, safe results.
Conclusion
Changing a drill bit on a Ryobi drill takes only a few minutes, but doing it the right way makes a big difference. Loosen the chuck, remove the old bit, insert the new one, and tighten it securely. Always power off the drill before starting, and make sure the bit is straight and tight.
Good habits like cleaning your chuck, checking bit alignment, and storing tools properly extend their life. Once you practice these steps a few times, changing bits will feel natural. With your Ryobi drill ready, every project—big or small—becomes faster, cleaner, and safer.


