How to Attach a Multi-Track Fence to a DeWalt Table Saw?
A multi-track fence gives a table saw more control, more accuracy, and more support for extra jigs. Many woodworkers add this upgrade to get smoother cuts and better results.
A DeWalt table saw accepts this upgrade with the right steps, the right parts, and the right setup. The process feels simple once the user understands the layout of the saw, the position of the rails, and the purpose of each piece of hardware.
This guide explains each step in clear language. No complex terms. No confusing instructions. Only a simple, friendly walk-through that helps a user attach a multi-track fence to any DeWalt portable table saw, including models like the DW745, DWE7480, DWE7491RS, and similar units.
Every step focuses on accuracy, safety, and ease. Many users follow this plan on their first try and complete the setup without stress. The goal is steady progress. Small steps. Clean adjustments. And a fence that sits straight, firm, and ready for work.
Understanding the Parts Before You Start
The Purpose of a Multi-Track Fence
A multi-track fence holds accessories like featherboards, flip stops, sacrificial faces, hold-down clamps, and measuring guides. The tracks in the fence accept T-bolts or T-nuts, so the user can slide attachments left or right. This design creates a flexible system. A standard DeWalt fence does not accept all these attachments. A multi-track fence solves that problem.
The upgrade helps with:
-
Safer cuts
-
Straighter rips
-
Better pressure against the workpiece
-
More options for jigs and accessories
-
Easy repeat cuts
A multi-track fence makes a small job feel smooth and controlled. Even a lightweight DeWalt saw gains more stability.
Tools and Materials You Need
Essential Tools
A basic setup only requires simple hand tools:
-
Tape measure
-
Square
-
Drill
-
Drill bits
-
Screwdriver
-
Hex key set
-
Pencil
-
Straightedge
Materials
Users normally need:
-
Multi-track fence extrusion
-
Mounting brackets
-
Screws or bolts that match the track slots
-
Washers
-
Nylon lock nuts
-
Optional wooden face for the fence
Each multi-track system comes with its own hardware, but some users add extra washers or bolts to improve the fit.
Prepare the Table Saw Before Fitting the Fence
Clear the Work Area
A clean work surface helps with accurate work. Dust or scraps cause the fence to sit uneven or shift slightly. So remove everything from the table. Remove push sticks, blades, riving knives, and loose pieces from the top.
Check the Factory Fence System
Some DeWalt models use a rack-and-pinion system. This system adjusts the fence smoothly. The user must keep the factory rails because the saw depends on them for alignment. A multi-track extrusion does not replace them. It attaches to the factory fence body or to the face of the DeWalt fence.
Inspect the Fence Body
Most DeWalt fences offer bolt holes or flat faces that accept screws. A smooth fence makes mounting simple. A dented or warped fence makes the new fence sit crooked. Straight is important.
Place a straightedge along the factory fence and check for light gaps. If the fence looks bent, adjust it before the upgrade.
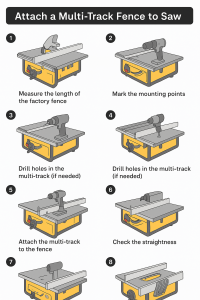
Attach a Multi-Track Fence to a DeWalt Table Saw
Now the steps. Clear. Simple. Direct.
Step 1: Measure the Length of the Factory Fence
A multi-track fence must match the length of the DeWalt fence. Measure the full length from the front end to the back end. Write down the number. Measure twice for accuracy.
Some users cut the extrusion shorter. Others keep it full length. A full-length track supports longer boards. A shorter track keeps the system lighter.
Step 2: Mark the Mounting Points
Place the multi-track extrusion against the face of the DeWalt fence. Hold it firm. Use a pencil to mark the points where screws will pass through the fence and into the track.
Space the marks evenly. Many users place one near each end and one in the center. Long fences may need four or five mounting points.
Even spacing prevents twist or sag.
Step 3: Drill Pilot Holes in the Fence
Remove the multi-track from the fence. Use a drill with a small bit to create pilot holes at each pencil mark. Move slowly. A fast drill creates burrs that cause screws to sit uneven.
Pilot holes guide the screws and prevent damage to the fence. The holes keep the screw path straight.
Step 4: Drill Holes in the Multi-Track (If Needed)
Some multi-track extrusions already come with pre-drilled holes. Others need new holes to match the fence.
Place the extrusion on a scrap board. Use masking tape to mark the hole spots. Drill clean holes straight through the track. Each hole must line up with a pilot hole on the fence.
A clean hole helps the bolt sit tight and strong.
Step 5: Attach the Multi-Track to the Fence Face
Hold the track against the fence. Insert bolts or screws through the track and into the fence holes. Slide washers onto the bolts before tightening the nuts. Washers spread pressure and protect the track.
Tighten each screw or bolt slowly by alternating between ends. Tighten the top bolt a bit, then the bottom bolt, then the center bolt. This prevents twist.
Stop once the track feels firm and straight. No wobble. No gaps.
Step 6: Check for Straightness
Place a straightedge across the track. The face must sit straight from top to bottom and from front to back.
If the track leans, loosen the screws. Add small washers behind the low area until the face sits straight.
This step is important. A crooked fence causes bad cuts and unsafe work.
Step 7: Align the Fence With the Blade
Slide the whole fence along the DeWalt rails until the front edge of the track sits next to the saw blade. Place a square against the blade. Move the fence until the track sits even with the square.
A straight fence produces clean, accurate cuts. A fence that sits out of alignment causes burn marks or kickback.
Tighten the DeWalt locking lever once everything lines up.
Step 8: Test Sliding Pressure and Movement
Move the fence across the table. The track should not drag or rub against the tabletop. The fence should move freely without shaking.
If the fence feels too tight:
-
Loosen the mounting bolts slightly
-
Adjust the angle of the track
-
Retighten evenly
If the fence feels loose:
-
Tighten the DeWalt fence clamps
-
Check the alignment of the track
-
Add nylon lock nuts for extra grip
A smooth slide gives better cuts.
Step 9: Add a Sacrificial Wooden Face (Optional)
Some woodworkers add a wooden face to the multi-track fence. This protects the fence during dado work or angled cuts. It also gives space for screws and accessories.
A wooden face attaches to the T-slots with T-bolts. Tighten the bolts gently so the wood sits flat.
A sacrificial face helps in many situations:
-
Cuts that pass close to the fence
-
Thin strips
-
Repetitive rips
-
Cuts that create tear-out
The wood face absorbs all damage and keeps the metal fence clean.
Step 10: Add Featherboards, Stops, and Accessories
A multi-track fence shines once accessories come into play. Each T-slot holds special hardware that slides and locks in place.
Useful accessories include:
-
Featherboards for grip
-
Flip stops for repeat cuts
-
Hold-down clamps for safer work
-
Tape measure strips for quick settings
-
Zero-clearance faces for clean edges
Slide the T-bolts into the track. Move the accessory to the right position. Tighten the knob.
The system becomes flexible and easy to adjust.
Extra Notes for Specific DeWalt Models
DW745 and DWE7480
These compact saws come with small fences. A long multi-track extension helps a lot. Many users add a wooden sub-fence to improve support.
DWE7491RS
This model has a stronger fence and more space for bolts. A multi-track attaches with fewer adjustments. The larger table also gives more room for jigs.
Older DeWalt Models
Older models need more careful measurement. Some fences have curved edges. A user may need flat spacers between the fence and the track.
Tips for Better Accuracy
Tip 1: Keep the Fence Straight
A fence that tilts a tiny bit causes bad cuts. Always check with a square.
Tip 2: Keep Hardware Tight
Loose bolts allow the fence face to shift. Tight hardware keeps everything secure.
Tip 3: Avoid Over-tightening
A bolt that sits too tight bends the aluminum track. A slight bend stops accessories from sliding.
Tip 4: Check Alignment After Heavy Cuts
Heavy plywood sheets can bump the fence. Check alignment from time to time.
Safety Tips
Wear Eye Protection
Small metal shavings fly while drilling.
Power Off the Saw
Unplug the unit before touching the blade area or fence.
Use Sharp Drill Bits
Dull bits tear through metal and create ragged holes.
Support Long Extrusions
A long track bends if not supported. Place scrap wood under each end while drilling.
Common Mistakes to Avoid
Mistake 1: Mounting the Track Too Low
A low track hits the table surface. The fence then drags during movement.
Mount the track high enough to stay clear.
Mistake 2: Mounting the Track Too High
A high track creates a gap under the fence face. Thin boards slide under the fence and cause inconsistent cuts.
Balanced height matters.
Mistake 3: Using the Wrong Hardware
Bolts that are too long pierce the back of the fence. Bolts that are too short fall out.
Use correct lengths.
Mistake 4: Skipping Alignment Checks
A fence that looks straight does not always cut straight. Only a square tells the truth.
FAQs
Can a beginner install a multi-track fence?
Yes. A beginner can install it with patience and simple tools.
Does the upgrade change the accuracy of the DeWalt fence?
It improves accuracy because the track face stays straight and rigid.
Do all multi-track fences fit all DeWalt saws?
Most fit, but each model needs exact measurements.
Does the rack-and-pinion system still work?
Yes. The multi-track attaches to the fence face, so the rack-and-pinion still moves the fence smoothly.
Can the user cut dadoes with the new fence installed?
Yes. A sacrificial wooden face helps during dado work.
Can the fence still accept factory attachments?
Yes. The upgrade only adds features. It does not remove factory functions.
Does the user need special tools?
No. Standard hand tools work fine.
Conclusion
A multi-track fence transforms a DeWalt table saw into a more flexible and more capable tool. The upgrade helps with accuracy, repeat cuts, accessory use, and improved safety. The process stays simple once the user measures carefully, drills clean holes, mounts the track straight, and aligns the fence with the blade.
Each step builds confidence. Each adjustment improves the final setup. A well-mounted multi-track fence supports any project with clean results and steady control. The saw feels easier to use. Cuts feel smoother. Work feels more relaxed.